Showing posts with label nail polish. Show all posts

Wednesday, 31 October 2012

Happy Halloween!

You may have seen the previous cake pops I made, well in honour of Halloween I made some more. I was hoping to make pumpkins, black cats and ghosts but I couldn't get all the ingredients I needed to I just made the ghosts.

The cake balls are coated in a layer of white candy melts with a circle of ready rolled icing on top. So cute!


I also did some Halloween inspired nail art:

Tuesday, 25 September 2012

A Nail a Day.

You may or may not know that as I'm currently working in a dull office job and not in design like I really want to, I have to find other ways to express my creativity. This is usually by repainting my nails every couple of days.

So here's a few variations I've tried out recently. Of course, they've all been finished off with a top coat of Seche Vite.

Kites

Barry M Nail Paints in White and Shocking Pink

White Tips
The white is Barry M again.
Rhinestones are from bigecity on ebay (I've used this seller many times, they're very good)
I tried doing this design with magic tape but found it was easier to just do them freehand.

Pink with Silver Glitter

The pink base coat is the same George from Asda one used previously.
The silver glitter is from a nail art pen set. You can find many of these on ebay.
Same rhinestones as before.

Mixed 1

I used a dotting tool for the white spots on the green and the green spots for the flower leaves. There are many dotting tools available from ebay (you've probably guessed this is my number one source for nail art tools!)
I also used a white nail art pen for the stripes - the thin brush actually makes this quite easy.

I like doing mixed nails when I don't quite know what I want to do so decide to try out a few ideas at once. There's also some things I see which I like but wouldn't want 10 nails of so it's also good for occasions like that.

Mixed 2

The 3D flowers and pearl rhinestones are also from bigecity on ebay.

Monday, 27 August 2012

Swing the Hammer.

A while ago I posted about the variety of nail wraps you can buy from Asos.

Well you may know by now that I'm not really quick to do anything (especially the amount of time it took me to get a film back from my Diana camera) but I've finally got round to trying them out.

The first ones were these Toonland nail wraps:
These are really, really cute but I found them a bit too thick and plasticy to fit on my nails properly. And because of where the image sits on the wrap it feels like they were upside down.

These doughnut and ice cream wraps were much more successful. They fit much better on my nails and because of the repeat pattern rather than a single image it's easier to get away with them not being perfect!

Another nail art craze I'm currently really into is nail decals, which I've gone a bit mad buying from ebay!

And just a cute little idea I painted just before I went on holiday (finished off with a layer of seche vite, they lasted the whole week!)

And how my nails currently look:

Friday, 24 August 2012

Champagne and Caviar.

Ok so I didn't drink champagne while writing this or while doing my nails, this is just a review of the latest trend in nail art - the caviar manicure.


The original, from Ciate, comes in either Black, Mother of Pearl or Rainbow, and is pretty pricey at £18 for a bottle of nail polish and the beads. However, after reading around about this manicure it seems there's a much cheaper alternative!

Many people suggested just getting some tiny beads from a craft shop and using them instead, which is what I did. I bought these no hole micro glass beads from totallycharmed81 on ebay (not currently for sale, but there's plenty of alternatives if you search for them)

The methods for applying them vary but I used this one:

1. Firstly pour the packet of beads into a little bowl/pot.
2. Apply two coats of black nail polish to each nail (I once again used my favourite, Barry M)
3. Apply a layer of Seche Vite - you need to do this one nail at a time.
4. Before it dries, dip the nail in the pot of beads, moving it around a bit to make sure all of the nail is exposed to the beads.
5. Pat the beads slightly to ensure they really stick to the nail.
6. Leave to dry for a couple of minutes.
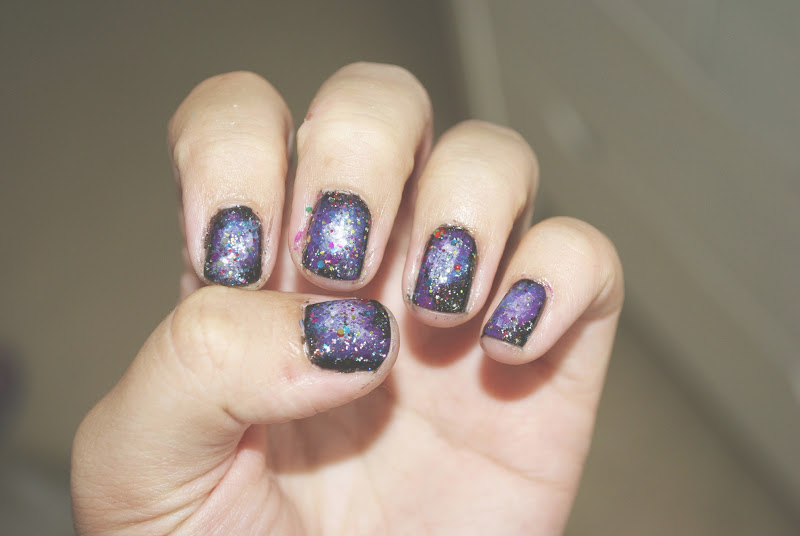
7. Using the top coat, apply a small amount to the very tip of the nail - if you o the whole nail the colour comes out the beads so just do the tip!
8. Ta da!

(For some reason I only took a photo on my phone :S)

I think these only lasted about 4 hours on my nails! They were beyond irritating, I was trying to cook dinner for 9 people and they just kept falling off (my friends were blissfully unaware that they were eating them!) They did look pretty cool before they fell off though, but not so great when there were big gaps of beads missing :S so I just took them off - easy enough with standard nail polish remover, and I managed to save most of the beads, which are now silver, but I mixed them in with the others so you'd never know.

However, I think I would use them again (going to have to really - I've got so many beads left!) but maybe only as a feature nail. Or get beads in one single colour then paint the nail the same colour so it's not so noticeable when they fall off.

Monday, 20 August 2012

In a Galaxy Far, Far Away....

I've always thought Galaxy nails look amazing but also really difficult, so I thought I'd have a go. And although they didn't quite come out how they look in other photos, they are actually quite easy to do.

So this is the process I used. First off was choosing which colours to use, from reading around it seems you can use pretty much any colour you want, and going by my nail polish collection I had quite a lot to choose between! There were 115 in there at last count....

So I eventually decided on these colours (as you can see I like Barry M!):

So you start off with a dark base colour. I used Barry M Black:

Because the glitter nail polishes I have didn't really seem right I also painted a layer of Gypsy Night from Topshop Nails:

Then using one of those foundation sponges I dabbed on three separate colours, in no particular order:

The glitter I used was Technic Carnival, which had a few too many colours in it and the flecks of glitter were a bit too large, so unfortunately it did ruin the overall effect:

Finished off with a layer of Seche Vite, my all time favourite top coat!
(Pre-cleaning! Oops!)
Related Posts Plugin for WordPress, Blogger...